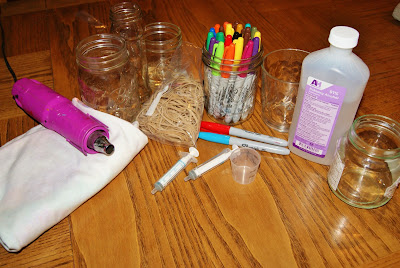
Have you seen the cool Sharpie Tie Dye projects that have been all over pinterest?
Did you pin them, but never looked at them again?
Well, this is one you MUST try.
It was so easy and very inexpensive!
You will need:
Sharpie markers (not the fabric kind - regular permanent Sharpie markers)
Rubber bands
Rubbing Alcohol - 91% is what I used
Different sized glasses/jars or plastic cups
Eye dropper (we used regular medicine droppers)
Heat tool/hair dryer/iron to heat set the designs
White T-shirt: You can find t-shirts at the dollar store and dollar tree
I happen to get mine on clearance at Kmart
You begin by placing a rubber band around a jar or glass that you've inserted between the layers of the shirt. One of the girls had a Minnie Mouse head design in mind when she started, but the others were very random with their design.Those that know me know that I struggled a wee bit with them doing anything that didn't seem "orderly" haha!
"Wait!! Why or you drawing THAT there?" I'd say in a little bit of a high pitched voice. And this is the look I would get from Naomi. haha. Classic. "Chill out Mom." That must be what she's thinking.
So, I just let them make any designs they wanted. Dots worked best, but squiggly lines and even pictures were good too!
Taryn helped her brother Marco and they decided to tie the sleeves up with the rubber bands "old school" style. Then he just colored each section.
Once you've drawn your design, you fill up your dropper with alcohol and "trace" your design with the alcohol. The more you add, the more it gets diluted and the larger your shape will get.
Then you want to heat dry your design with a blow dryer on high heat (be careful with this step! You can get burned!)
When it feels dry, remove the rubber bands and then do another design.
Teamwork!!
I ran a hot iron over each of the shirts when they were done, just for good measure. We were very happy with the results. Easy peezy - lemon squeezy!!
We wrote a name after we heat set the design and then heat set it again (without adding more alcohol)
Here's the sleeve where he tied the rubber bands old school style. Oh and see the circular squiggly design there? That was one that I panicked a little bit about but it turned out great!!
I also saw on Pinterest that you could do this with hats, white canvas tennis shoes, aprons, etc.
Have fun!


1 comment:
Ok, this is a little different than the shirt we did yesterday with sharpies & alcohol. I like your results WAY better! I'll have to try again YOUR way!
Post a Comment